The ![]() Stationery Layout window allows you to change the size of a page and the items on the page. To display this window click the
Stationery Layout window allows you to change the size of a page and the items on the page. To display this window click the ![]() Stationery layout button in the
Stationery layout button in the ![]() Stationery pane.
Stationery pane.
The Preview tab shows the shape of the page and the size and position of the stationery items.
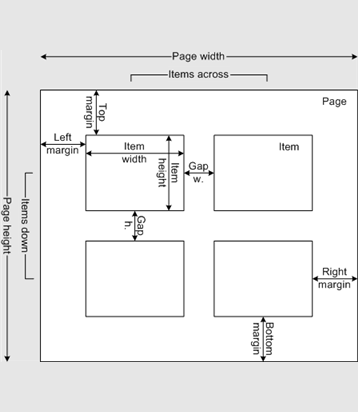
The Nomenclature tab shows the meaning of the dimension fields in this window (shown a bit larger below).

Change Units to change between mm and inches.
Click on a Pre-defined stationery type to set the layout accordingly. Type a text into the ![]() Search field to hide non-matching stationery types, e.g. type J8161 to find Avery J8161 address labels. Use the Manufacturers, Types and Paper sizes drop-down lists to filter which pre-defined stationery are listed.
Search field to hide non-matching stationery types, e.g. type J8161 to find Avery J8161 address labels. Use the Manufacturers, Types and Paper sizes drop-down lists to filter which pre-defined stationery are listed.
Change the Orientation between Portrait and Landscape, depending on how you wish to print the stationery.
Click Centre items to centre the items in the page (i.e. Left margin to Right margin and Top margin to Bottom margin).
If you create your own layout you will be prompted to save it by the ![]() Save Stationery Layout window.
Save Stationery Layout window.
Note Right margin and Bottom margin are set automatically based on the other dimensions.
Click OK to accept the changes and close the window. Click Cancel to discard any changes and close the window.
See also:
•![]() Create place cards and other stationery (video with audio, 10:08 minutes)
Create place cards and other stationery (video with audio, 10:08 minutes)