You can import guest details from spreadsheets, databases and other formats, so that you don't have to re-type them. We will illustrate this by importing some guest details from Excel. The principles are similar for other applications and file formats.
Note The user interface of Excel may differ between different versions.
Create a simple Excel spreadsheet like the one below:
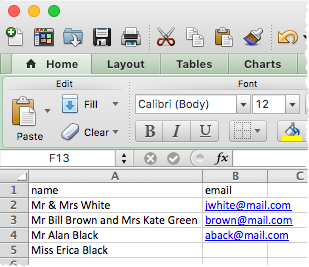
PerfectTablePlan for Mac can't read Excel binary files, so you need to save your spreadsheet into a .csv (comma separate value) file that PerfectTablePlan can read.
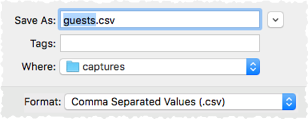
Creating a .csv file in ExcelSelect File>Save As and save it as the .csv file guests.csv (do not just rename a .xls file to a .csv file). Click Continue on any windows warning you about changing format.
The data is now in a format PerfectTablePlan can read. |
If PerfectTablePlan is running create a new plan by selecting File>![]() New. Otherwise start PerfectTablePlan.
New. Otherwise start PerfectTablePlan.
Select File>![]() Import. The
Import. The ![]() Import window will appear.
Import window will appear.
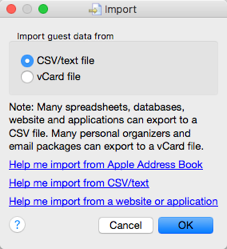
Ensure CSV/text file is selected and click the OK button. An Open window will appear. Navigate to the .csv file you just created and click Open. You should now see the contents of the Excel file in the Import Data window.
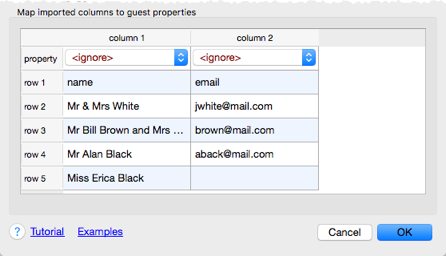
Click the ![]() button and tell PerfectTablePlan which columns correspond to which guest properties and to ignore the first row, as shown below.
button and tell PerfectTablePlan which columns correspond to which guest properties and to ignore the first row, as shown below.
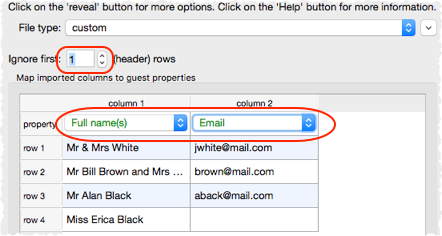
Note that you can edit the data in the table before you import it. This will not affect the original .csv file.
Click the OK button. If you are prompted to Save this import mapping to use again? click Don't save. The guests should now be imported as below.
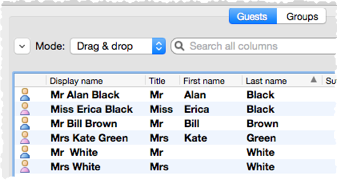
PerfectTablePlan has used title preferences to extract titles and to guess age and gender. If it has guessed anything incorrectly you can easily change it in Edit mode or Edit>![]() Undo the changes.
Undo the changes.
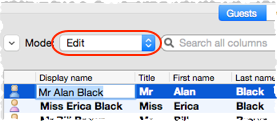
The email address has been added to the guest Contact information.
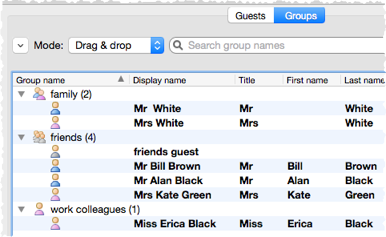
It has also placed guests into groups.
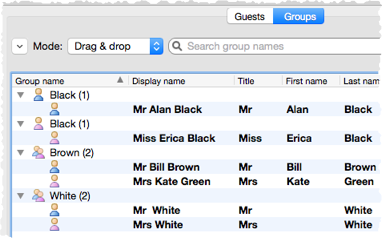
If you don't like how they have been grouped you can easily drag guests between groups in Drag and drop mode in the ![]() Groups pane. Note that you could have placed Mr Alan Black and Miss Erica Black in the same group by checking group consecutive guests with the same last name in the Import window.
Groups pane. Note that you could have placed Mr Alan Black and Miss Erica Black in the same group by checking group consecutive guests with the same last name in the Import window.
If you look in the ![]() Proximity pane you will see it has set
Proximity pane you will see it has set ![]() proximity for the guests in each group.
proximity for the guests in each group.
If you want more control over groups you can add a group column to your spreadsheet.
Select File>![]() New to clear the current plan. Click on Don't save. Add an additional group column and guest column to your spreadsheet, as below.
New to clear the current plan. Click on Don't save. Add an additional group column and guest column to your spreadsheet, as below.

Save and re-import the new spreadsheet into PerfectTablePlan (as above). Select the property drop-down lists as shown below.
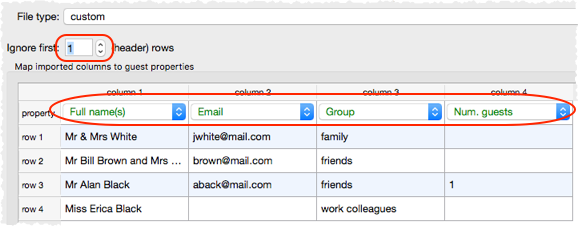
Click the OK button. If you are prompted to Save this import mapping to use again? click Don't save.
The guests have now been imported in the groups you specified and an unnamed guest has been added for Mr Alan Black.
You can also import many other properties, such as addresses, meal choice, VIP status, RSVP status etc. . See Import Data window and example import formats for more details.
If you are importing data in a format PerfectTablePlan already knows about you can select the format from the File type menu:

Click on the ![]() button in the
button in the ![]() Import Data window to show additional options. These options give you full control over how the import file is interpreted. For example you can specify that columns in the import file are separated by Tab characters, rather than commas:
Import Data window to show additional options. These options give you full control over how the import file is interpreted. For example you can specify that columns in the import file are separated by Tab characters, rather than commas:
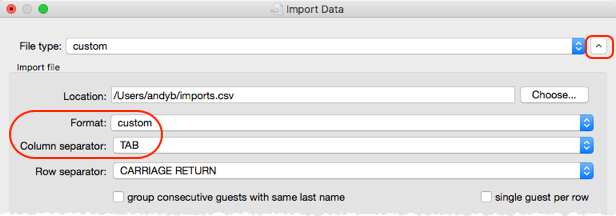
Note If your spreadsheet contains non-ASCII characters (e.g. Chinese or other Unicode characters) these may be lost if you save your Excel .xls file to a .csv file. To avoid this problem save as Unicode text (*.txt) and import using Custom format and a TAB delimiter.
You can also import guest name data using the simpler (but less flexible) Quick Add Guests window.
You can also import guests from any application that supports vCard format. This includes many email and address book applications. Just drag the guest vCard(s) onto the PerfectTablePlan ![]() Guests pane.
Guests pane.
See also:
Next: 10. Check-in guests >>
