This page provides instructions to get you started using PerfectTablePlan quickly. If you want step-by-step instructions please go to the Tutorial.
There are 5 simple steps to creating a table plan:
2.Decide who should sit near (or not near) whom.
These 5 steps correspond to the 5 Task tool bar buttons.
|
|
|
|
|
When one of these buttons is pressed you will only be able to see the panes and tool bar buttons appropriate to that task.
Ensure View>User interface>Basic is selected so that the Task tool bar is visible.
 1. Add guests
Click on the ![]() button in the Task tool bar, if it isn't already selected.
button in the Task tool bar, if it isn't already selected.
Guests can be added as individuals, couples, families or groups using Insert>![]() Single Guest, Insert>
Single Guest, Insert>![]() Guest Couple, Insert>
Guest Couple, Insert>![]() Guest Family, Insert>
Guest Family, Insert>![]() Guest Group or the equivalent Insert tool bar buttons. You can add everyone as individuals, but it saves time to add them as couples, families and groups, where appropriate.
Guest Group or the equivalent Insert tool bar buttons. You can add everyone as individuals, but it saves time to add them as couples, families and groups, where appropriate.
Each guest has the following properties:
Property |
Meaning |
Anon |
Check this if you don't know the guest's name yet. |
Title |
The guest's title. |
First name |
The guest's first (given) name(s). You can also record middle names or initials, if you wish. |
Last name |
The guest's last (family) name(s). |
Suffix |
Any title or role that comes after the name. |
Display name |
The name you wish to display for the guest (which may include qualifications, job title and other information). |
Gender |
Whether the guest is male or female. |
Age |
Whether the guest is an adult or a child. |
Meal |
The guest's choice of meal (separated by commas if there are choices in multiple courses). |
Special req |
Any special requirements the guest has, e.g. diabetic or in a wheelchair (separated by commas if there is more than one special requirement). |
Notes |
Used to record useful information not recorded elsewhere. |
VIP |
Used to mark a Very Important Person; for a wedding this may be a member of the wedding party, for a conference it may be a keynote speaker and for a business lunch it may be a table sponsor. |
RSVP |
Whether the guest has been sent an invitation, accepted, declined, cancelled or arrived. |
Most of this information is optional, but a guest must have at least a first name or a last name. Guests are shown in bold if they have not been assigned a seat. You can also add custom properties in the Advanced and Professional editions of PerfectTablePlan.
In addition, every guest is a member of a group (even single guests belong to their own group). Each group has optional contact details and notes. Each group only has one set of contact details, so generally you should assign people to a group if they have the same contact address (e.g. a couple or representatives from the same company). You can easily drag guests from one group to another in the ![]() Groups pane.
Groups pane.
If you already have guest data (for example as vCards, in a spreadsheet, text file or address book) you can import it using File>![]() Import.... See Importing data for more information.
Import.... See Importing data for more information.
You can also quickly create a guest list using Insert>![]() Quick Add Guests or the equivalent Insert tool bar button. This allows you to enter one guest/couple/family/group per line in free text format.
Quick Add Guests or the equivalent Insert tool bar button. This allows you to enter one guest/couple/family/group per line in free text format.
Once you have entered a guest's details you can change their properties later by selecting them and then choosing Edit>![]() Properties or the equivalent Main tool bar button.
Properties or the equivalent Main tool bar button.
Click on the appropriate column headers in the ![]() Guests pane to sort the guests by first name, last name etc. You can also see how guests are grouped in the
Guests pane to sort the guests by first name, last name etc. You can also see how guests are grouped in the ![]() Groups pane.
Groups pane.
You can enter general information about your event using File>![]() Information... and check the number of attendees and cost using File>
Information... and check the number of attendees and cost using File>![]() Numbers and Budget....
Numbers and Budget....
You should now make sure you save your plan using File>![]() Save. You will be asked to provide a name for the new plan file.
Save. You will be asked to provide a name for the new plan file.
 2. Decide who should sit near whom
Click on the ![]() button in the Task tool bar.
button in the Task tool bar.
You may want to have some guests sitting close to each other (for example couples, friends and people who you think might be compatible) and some sitting far apart (for example divorced couples). The automatic assignment function will take this into account when it decides where to place guests.
Proximity |
Icon |
Meaning |
Next to |
|
Should be placed next to each other. |
Near to |
|
Should be placed next to or on the same table. |
Neutral |
|
No preference. |
Not Next to |
|
Should not be placed next to and preferably not on same table. |
Not Near to |
|
Should not be placed on the same table. |
If you add guests using Insert>![]() Guest Couple, Insert>
Guest Couple, Insert>![]() Guest Family or Insert>
Guest Family or Insert>![]() Guest Group, a sensible default value will be set for their proximity. However you can change the proximity so that members of a group are not sat together.
Guest Group, a sensible default value will be set for their proximity. However you can change the proximity so that members of a group are not sat together.
You can view and edit the proximity of guests in the ![]() Proximity pane. Just click on the appropriate drop-down menu in the table to change the proximity. Note that the table is symmetric - if you change the proximity for column A and row B the proximity for row A and column B will change to match.
Proximity pane. Just click on the appropriate drop-down menu in the table to change the proximity. Note that the table is symmetric - if you change the proximity for column A and row B the proximity for row A and column B will change to match.
If you want to set the proximity for a number of guests, select them all in the ![]() Guests pane (using Shift+click or
Guests pane (using Shift+click or ![]() +Click) and then select the appropriate proximity from Edit>Proximity (you must select more than one guest). You will need to click on the
+Click) and then select the appropriate proximity from Edit>Proximity (you must select more than one guest). You will need to click on the ![]() button to show the
button to show the ![]() Guests pane.
Guests pane.
 3. Add tables
Click on the ![]() button in the Task tool bar.
button in the Task tool bar.
Tables can be added using the Insert menu, e.g. Insert>![]() Circular Table, or the equivalent Insert tool bar button. The types of table are:
Circular Table, or the equivalent Insert tool bar button. The types of table are:
Table |
Icon |
Meaning |
E-shaped |
|
A head (top) table + 2 or more sprigs (legs) (Advanced and Professional editions only) |
Rectangular |
|
A rectangular or square table with seats on four sides. |
Banquet |
|
A long table with seats on two sides. |
Head |
|
A long table with seats on only one side, for example a head (top) table at a wedding or banquet. |
Custom |
|
A rectangular or square table with potentially different numbers of seats on each of the 4 sides. |
Circular |
|
A circular table with seats all around it. |
Semi-circular |
|
A semi-circular table with seats around the straight side and/or curved sides. |
Oval |
|
An elliptical table with seats all around it. |
Row of seats |
|
A row of seats (no table). |
Each table has the following properties:
Property |
Meaning |
Name |
The name displayed for the table. The default name is "Table 1" , "Table 2" etc, but you can set any name. |
Shape |
See above. |
Angle |
The rotation angle of the table in the |
Colour |
The colour of the table in the |
Seats |
The number of seats for the table. |
Size |
The size of the table. Check the auto check box to size the table automatically (according to the seat size and the number of seats). |
VIP |
Check the box to designate a VIP table. The automatic seat assignment attempts to assign VIP guests to VIP tables. |
Notes |
Used to record useful information not recorded elsewhere. |
The Create field allows you to add more than one table at a time.
Once you have created a table you can change any of its properties (including the name and shape) by selecting it and then choosing Edit>![]() Properties or the equivalent Main tool bar button.
Properties or the equivalent Main tool bar button.
You should make sure that you have enough seats for all your guests. You can see how many seats and guests you have at any time by looking in the Status bar at the bottom of the Main window.
![]()
New tables will be placed in an empty space near the centre of the ![]() Floor Plan pane. You can move tables in the
Floor Plan pane. You can move tables in the ![]() Floor Plan by dragging them (left click on the centre of a table, hold down the left mouse button and drag to the appropriate position). You can zoom in and out of the
Floor Plan by dragging them (left click on the centre of a table, hold down the left mouse button and drag to the appropriate position). You can zoom in and out of the ![]() Floor Plan using the
Floor Plan using the ![]() and
and ![]() buttons, or zoom so all tables are visible using the
buttons, or zoom so all tables are visible using the ![]() button. When you are zoomed in you can move around the
button. When you are zoomed in you can move around the ![]() Floor Plan by dragging the background (the cursor will change to a hand) or clicking on the scroll bars. You can change the size of the floor plan using the
Floor Plan by dragging the background (the cursor will change to a hand) or clicking on the scroll bars. You can change the size of the floor plan using the ![]() button.
button.
Use the ![]() Insert text ,
Insert text , ![]() Insert image and
Insert image and ![]() Insert shape buttons to add text, images and shapes to the
Insert shape buttons to add text, images and shapes to the ![]() Floor Plan pane. Text can be used for titles, headers and footers. Images can be used for decorations, logos or clipart. Shapes can be used to represent dance floors, stages, walls and other features of your floor plan.
Floor Plan pane. Text can be used for titles, headers and footers. Images can be used for decorations, logos or clipart. Shapes can be used to represent dance floors, stages, walls and other features of your floor plan.
Rotate a table, shape or text 45 degrees clockwise by clicking the ![]() Rotate button.
Rotate button.
Move a table, shape or text behind (under) another by clicking the ![]() Move to Back button.
Move to Back button.
You can also view one table at a time in the ![]() Table Plan pane. Use the
Table Plan pane. Use the ![]()
![]()
![]()
![]() navigation buttons to view different tables.
navigation buttons to view different tables.
Save your plan using File>![]() Save.
Save.
 4. Assign guests to seats
Click on the ![]() button in the Task tool bar.
button in the Task tool bar.
Once you have entered guest details and added tables, you can assign seats automatically or by using drag and drop. You will often need a combination of both for best results.
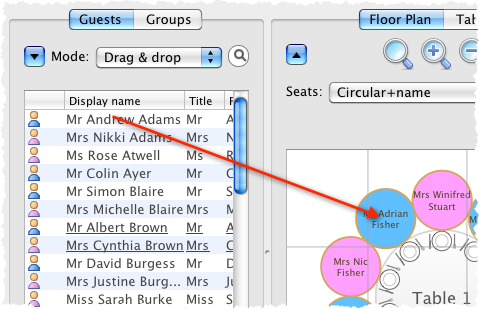
If you have people that you definitely want to sit in certain seats (for example the wedding party or VIP guests) you should assign their seats manually. Drag these guests or groups from the ![]() Guests or
Guests or ![]() Groups pane to the appropriate table or seats in either the
Groups pane to the appropriate table or seats in either the ![]() Floor Plan,
Floor Plan, ![]() Table Plan or
Table Plan or ![]() Schematic panes. To drag a guest or group left click, hold down the mouse button and drag to the appropriate seat (select more than one guest/group by using Shift+click or
Schematic panes. To drag a guest or group left click, hold down the mouse button and drag to the appropriate seat (select more than one guest/group by using Shift+click or ![]() +click). Drag a whole group by holding down the Shift key when you start to drag a member of that group. Make sure the
+click). Drag a whole group by holding down the Shift key when you start to drag a member of that group. Make sure the ![]() Guests or
Guests or ![]() Groups pane is set to drag and drop mode.
Groups pane is set to drag and drop mode.
You can 'lock' guests to stop the automatic seat assignment moving them later. Lock them in place by selecting the guests, for example in the ![]() Guests or
Guests or ![]() Floor Plan pane, and choosing Edit>Guest Property>Locked>
Floor Plan pane, and choosing Edit>Guest Property>Locked>![]() Yes (you can also select a table and lock all the guests on it).
Yes (you can also select a table and lock all the guests on it).
The rest of the guests can now be assigned to the remaining seats automatically by selecting File>![]() Auto Assign Seats or the equivalent Main tool bar button. If you have a large table plan (200+ guests) you may need to increase the amount of time allowed for the automatic assignment in the
Auto Assign Seats or the equivalent Main tool bar button. If you have a large table plan (200+ guests) you may need to increase the amount of time allowed for the automatic assignment in the ![]() Preferences window.
Preferences window.
The automatic assignment will try to find the best seating assignment using a scoring approach. The scoring takes account of:
•guest proximity
•alternating genders (if selected in the ![]() Preferences window)
Preferences window)
•seating VIPs on VIP tables
•not seating guests on their own
•VIPs score higher than guests who aren't VIPs
You can halt the automatic assignment at any time by pressing the Stop button. The best solution so far will be kept. If you don't like the changes you can select Edit>![]() Undo to undo the change.
Undo to undo the change.
You can reassign guests by dragging and dropping them in the ![]() Floor Plan,
Floor Plan, ![]() Table Plan or
Table Plan or ![]() Schematic panes to fine-tune the seat assignments. You can also change proximities and re-run File>
Schematic panes to fine-tune the seat assignments. You can also change proximities and re-run File>![]() Auto Assign Seats as often as you like.
Auto Assign Seats as often as you like.
You can see how good your seat assignment is by looking at the scores in the ![]() Schematic pane (check show scores, positive scores are good, negative scores are bad) or by holding down the proximity buttons at the top of the
Schematic pane (check show scores, positive scores are good, negative scores are bad) or by holding down the proximity buttons at the top of the ![]() Floor Plan or
Floor Plan or ![]() Table Plan panes. For example the
Table Plan panes. For example the ![]() button will show you any non-ideal positioning (such as guests with proximity
button will show you any non-ideal positioning (such as guests with proximity ![]() who aren't sat next to each other). To see these proximity buttons you will need to click on the
who aren't sat next to each other). To see these proximity buttons you will need to click on the ![]() button in the
button in the ![]() Floor Plan or
Floor Plan or ![]() Table Plan pane. Obviously, what makes a good table plan is hard to fully define in mathematical terms, but the score will usually give a fair indication.
Table Plan pane. Obviously, what makes a good table plan is hard to fully define in mathematical terms, but the score will usually give a fair indication.
Use the ![]() Table Chart pane to see your plan ordered by table.
Table Chart pane to see your plan ordered by table.
Use the ![]() Guest Chart pane to see your plan ordered by guest last name.
Guest Chart pane to see your plan ordered by guest last name.
Use the ![]() Report pane to see reports about your plan, including a Summary report and a Troubleshooting report.
Report pane to see reports about your plan, including a Summary report and a Troubleshooting report.
At any time you can unassign a guest from their seat by choosing Edit>Unassign or dragging them on to the background in the ![]() Floor Plan or
Floor Plan or ![]() Table Plan pane. You can select multiple guests for unassigning (except in the
Table Plan pane. You can select multiple guests for unassigning (except in the ![]() Floor Plan or
Floor Plan or ![]() Table Plan pane) by using Shift+click or
Table Plan pane) by using Shift+click or ![]() +Click.
+Click.
 5. Output
Click on the ![]() button in the Task tool bar.
button in the Task tool bar.
When you are happy with your table plan you can:
•Print off the ![]() Floor Plan ,
Floor Plan , ![]() Table Plan,
Table Plan, ![]() Table Chart,
Table Chart, ![]() Guest Chart,
Guest Chart, ![]() Stationery and/or
Stationery and/or ![]() Report panes using File>
Report panes using File>![]() Print or the equivalent Main tool bar button.
Print or the equivalent Main tool bar button.
•Copy the contents of the ![]() Floor Plan ,
Floor Plan , ![]() Table Plan,
Table Plan, ![]() Table Chart,
Table Chart, ![]() Guest Chart and/or
Guest Chart and/or ![]() Report panes into the clipboard using Edit>
Report panes into the clipboard using Edit>![]() Copy.
Copy.
•Export your plan to another application using File>![]() Export.
Export.
•Order a digital poster print or place cards using File>![]() Order Posters and Cards.
Order Posters and Cards.
•Display seating assignments as scrolling text on a VDU or plasma screen at the venue using the ![]() VDU Chart pane.
VDU Chart pane.
The ![]() Stationery pane allows you to print place cards, badges, escort cards, labels, invitations and other stationery. You can easily merge guest names and addresses and other details into stationery items using substitution text.
Stationery pane allows you to print place cards, badges, escort cards, labels, invitations and other stationery. You can easily merge guest names and addresses and other details into stationery items using substitution text.
Make sure you save your plan using File>![]() Save before exiting.
Save before exiting.
If you want to get a feel for editing a table plan without creating a whole new plan, try experimenting with the sample plans supplied with PerfectTablePlan.
This completes the quick start guide.
See also: