To show spacing guides around tables in the ![]() Floor Plan pane:
Floor Plan pane:
1.Click on the ![]() button at the top-left of the pane.
button at the top-left of the pane.
2.Click on the ![]() button to show the Table/Seat Spacing window.
button to show the Table/Seat Spacing window.
3.Set Space to Tables.
4.Set Units, Spacing from side with seats and Spacing from side without seats.
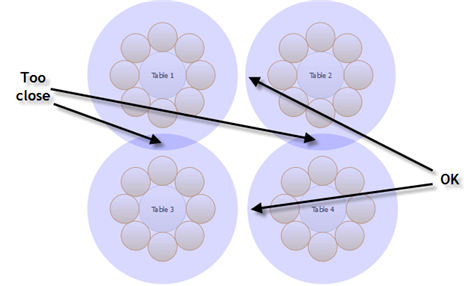
A coloured guide will appear around each table. This makes it easy to see whether tables have been placed too close to each other. You can control the Colour and Transparency of these guides.

Click the ![]() button again to turn off the spacing guides.
button again to turn off the spacing guides.
Typically it is reckoned that the following spacings are a minimum for allowing guests and staff to move between tables:

These equate to values for Spacing from side with seats and Spacing from side without seats of 0.75m and 0.3m respectively. These are set as the default values.
Note The circular seats are not a realistic size. You may be better off using rectangular seats, chairs or not displaying the seats.
If most of your tables are the same size and shape and you want to space them evenly, you can create a snap grid of the appropriate size. For example, if your tables are 2m in diameter and you want 1.5m between them, you can create a 3.5m snap grid to snap the table centres to.
Spacings are not shown for rows of seats.
You can use the  |
Important Don't forget about emergency exit routes and fire regulations when you set-up your floor plan.
See also:
•![]() Create a floor plan (video with audio, 10:27 minutes)
Create a floor plan (video with audio, 10:27 minutes)