The ![]() Floor Plan pane shows an 'aerial' view of your table plan. You can only select one seat or table at a time in this pane.
Floor Plan pane shows an 'aerial' view of your table plan. You can only select one seat or table at a time in this pane.
Appearance
Clicking on the ![]() and
and ![]() buttons zooms in and out. Clicking on the
buttons zooms in and out. Clicking on the ![]() button zooms and scrolls (pans) the display to show all the tables in your plan. You can also use a 'pinch' gesture to zoom, if your device supports gestures. When you are zoomed in you can move around by clicking on the scroll bars or by holding down the right mouse button and dragging the background (the cursor will change to a hand).
button zooms and scrolls (pans) the display to show all the tables in your plan. You can also use a 'pinch' gesture to zoom, if your device supports gestures. When you are zoomed in you can move around by clicking on the scroll bars or by holding down the right mouse button and dragging the background (the cursor will change to a hand).
Toggle the ![]() button on/off to magnify the area under the mouse cursor. Magnification allows you to read a large plan without having to zoom in and out. You can change the size of the area magnified and the level of magnification using the sliders in the Configure magnification cursor window that appears when you press the button in.
button on/off to magnify the area under the mouse cursor. Magnification allows you to read a large plan without having to zoom in and out. You can change the size of the area magnified and the level of magnification using the sliders in the Configure magnification cursor window that appears when you press the button in.
By default the inside of the floor plan is shown in white and the outside of the floor plan is shown in grey.
You can change the floor plan dimensions and units by clicking on the ![]() button. You can also set whether a grid is drawn (and what size) and whether tables, shapes and text are snapped to a grid (and what size).
button. You can also set whether a grid is drawn (and what size) and whether tables, shapes and text are snapped to a grid (and what size).
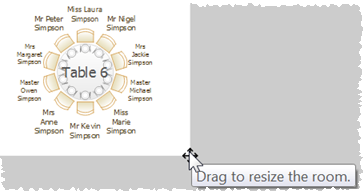
You can also change the size of the floor plan by dragging the bottom-right corner.
Click the |
Click the ![]() Insert Line button to add a line or wall to the floor plan.
Insert Line button to add a line or wall to the floor plan.
Click the ![]() Insert text button to add text to the floor plan (e.g. a title). We would really appreciate a mention of www.perfecttableplan.com in the footer!
Insert text button to add text to the floor plan (e.g. a title). We would really appreciate a mention of www.perfecttableplan.com in the footer!
Click the ![]() Insert shape button to add shapes to the floor plan (e.g. to represent dance floors or stages).
Insert shape button to add shapes to the floor plan (e.g. to represent dance floors or stages).
Click the ![]() Insert image button to add images to the floor plan (e.g. to add a logo). You can also drag an image from your operating system or web browser onto the
Insert image button to add images to the floor plan (e.g. to add a logo). You can also drag an image from your operating system or web browser onto the ![]() Floor Plan pane.
Floor Plan pane.
Click the Click the |
Click the ![]() Rotate button to rotate the selected table, shape or text item 45 degrees clockwise. For finer control use the Angle field in the Table Properties window.
Rotate button to rotate the selected table, shape or text item 45 degrees clockwise. For finer control use the Angle field in the Table Properties window.
Click the ![]() Move to Back button to move the selected item behind (under) others in the vertical stacking order.
Move to Back button to move the selected item behind (under) others in the vertical stacking order.
Click the ![]() button to change the fonts and colours. The table colour will be overridden by colours set for individual tables through the Table Properties window.
button to change the fonts and colours. The table colour will be overridden by colours set for individual tables through the Table Properties window.
Note If the name of a guest can't be fitted into the space available in the ![]() Floor Plan pane the font will automatically be scaled smaller for that name to try to make it fit.
Floor Plan pane the font will automatically be scaled smaller for that name to try to make it fit.
Hint If you want to seamlessly join two tables set the inner and outer colours of the table to be the same.
Type text in the ![]() Search field to select matching floor plan items. E.g. if you type x it will select all floor plan items that contain an 'x' (case is ignored). Click the
Search field to select matching floor plan items. E.g. if you type x it will select all floor plan items that contain an 'x' (case is ignored). Click the ![]() cancel icon or press the Esc key to clear the field. Note that only text visible in the floor plan is searched (e.g. the contents of a guest's Notes field will only be searched if the Display drop-down field is set to Notes).
cancel icon or press the Esc key to clear the field. Note that only text visible in the floor plan is searched (e.g. the contents of a guest's Notes field will only be searched if the Display drop-down field is set to Notes).
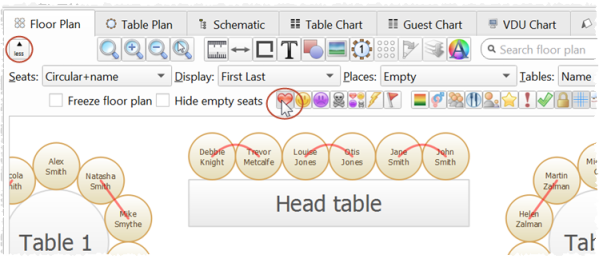
Click on the ![]() button to show additional options.
button to show additional options.
Select from the Seats drop-down list according to how you want seats and guest names to be displayed.
Select from the Display drop-down list to change the text that is displayed for assigned seats.
Set the Display drop-down list to Custom name... to choose your own name format. This can include HTML tags and custom fields. For example: {last}, {title} {f}<br><i>({position})</i> Where position is a custom field. |
Select from the Places drop-down list according to whether you want the guest place setting to be Empty, show Tableware (plate+cutlery) or the Seat number. If you choose Seat number (small, medium or large) it will be shown in the same font as the table name, but automatically resized to fit. If the seat number is more than 2 characters long (e.g. because you have used the custom seat numbering available in the Advanced and Professional editions) it may be truncated or overlap other text.
Select from the Tables drop-down list according to what text you want displayed for the table. If you show unassigned seats, any unassigned seats may also be highlighted with a red cross, depending on the setting for Seats.
Note The name and number of seats assigned/unassigned is not displayed for a row of seats in the Floor Plan pane.
Changing the Floor Plan
New tables are inserted in a vacant space near the current centre of the pane. Once a table has been placed you can drag it to any location inside the floor plan.
You can also use the keyboard arrow keys to move selected items. If grid snap is not on, you can hold down the Shift key to make smaller movements.
Guests can be dragged between seats or from the ![]() Guests pane or
Guests pane or ![]() Groups pane (set the Left pane Mode to drag & drop). Drop a guest away from a seat or table to unassign them.
Groups pane (set the Left pane Mode to drag & drop). Drop a guest away from a seat or table to unassign them.
Note If you drag a guest on to a seat where another guest is already assigned, the guest will swap seat with the guest being dragged.
If you drag to the edge of the pane the pane will scroll automatically.
Double-click on a table or guest to show the Properties window.
Right-click on a table or seat to display actions in a pop-up menu.
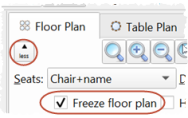
Check Freeze floor plan to prevent changes to the positions of tables, shapes, images and text items on this pane. Note that you can still reassign guests and change some item properties.
Check Hide empty seats to hide seats with no assigned guest (and any corresponding place settings). This makes drag and drop harder and is generally only recommended when you are printing or exporting.
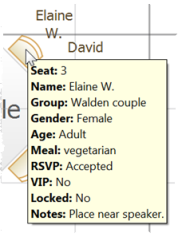
When you hover the mouse cursor over a table or assigned seat a tool tip window with summary information will appear. You can turn these tool tips on/off in the ![]() Preferences window.
Preferences window.
Hold down the ![]() button to show all guests that should be sitting next to each other.
button to show all guests that should be sitting next to each other.
Hold down the ![]() button to show all guests that should be sitting near to each other.
button to show all guests that should be sitting near to each other.
Hold down the ![]() button to show all guests that should not be sitting next to each other.
button to show all guests that should not be sitting next to each other.
Hold down the ![]() button to show all guests that should be not be sitting near to each other.
button to show all guests that should be not be sitting near to each other.
Hold down the ![]() button to show all guest proximities.
button to show all guest proximities.
Hold down the ![]() button to show potential seating issues, e.g. guests with
button to show potential seating issues, e.g. guests with ![]() proximity that aren't sitting next to each other.
proximity that aren't sitting next to each other.
Hold down the ![]() button to show critical seating issues, e.g. guests that aren't sitting next to any of their
button to show critical seating issues, e.g. guests that aren't sitting next to any of their ![]() proximity guests.
proximity guests.
If you hold down the Shift key while pressing any of the above 6 buttons, only the proximity for guests whose tables or chairs are selected will be shown. This can be very useful when showing the proximities of all guests is too confusing.
If you hold down the Alt key while pressing any of the above 6 buttons, custom proximities will also be shown. This can be a lot of proximities, so you may need to use it when selecting a subset of guests and also holding down the Shift key. |
Depress the ![]() button to colour code guests according to how well seated they are based on the proximity of nearby guests; green for well seated and red for poorly seated.
button to colour code guests according to how well seated they are based on the proximity of nearby guests; green for well seated and red for poorly seated.
Depress the ![]() button to colour code guest genders (blue for male, pink for female, grey for undefined).
button to colour code guest genders (blue for male, pink for female, grey for undefined).
Depress the ![]() button to show the age of guests (large circle for adult, small circle for child).
button to show the age of guests (large circle for adult, small circle for child).
Depress the ![]() button to colour code which groups guests belong to.
button to colour code which groups guests belong to.
Depress the ![]() button to show colour-coded meal choices. Each meal is displayed in a different colour. If you have more than one course (e.g. “soup,fish,ice cream”) the courses will be displayed as concentric rings: outer ring=first course, second ring=second course etc.
button to show colour-coded meal choices. Each meal is displayed in a different colour. If you have more than one course (e.g. “soup,fish,ice cream”) the courses will be displayed as concentric rings: outer ring=first course, second ring=second course etc.
You can also colour code guests by custom field.
Note The visualization colours are chosen automatically by default. We have chosen the 12 default colours to be easily distinguishable, even for people with most types of colour blindness. But you can change these colours in the ![]() Visualization colours window.
Visualization colours window.
Depress the ![]() button to show VIP guests and VIP tables.
button to show VIP guests and VIP tables.
Depress the ![]() button to show guests with special needs.
button to show guests with special needs.
Depress the ![]() button to show guest RSVP status.
button to show guest RSVP status.
Depress the ![]() button to show locked guests.
button to show locked guests.
Depress the ![]() button to show guides lines when you select a single floor plan item.
button to show guides lines when you select a single floor plan item.
Depress the ![]() button to show spacings around each table (but not rows of seats).
button to show spacings around each table (but not rows of seats).
Depress the ![]() button to show a colour key when you are using to colour to visualize gender, groups, meals and custom fields.
button to show a colour key when you are using to colour to visualize gender, groups, meals and custom fields.
Hint Some of the above will be easier to see if you use simple (e.g. default ) colours in the ![]() Floor Plan pane.
Floor Plan pane.
Mouse wheel
If your mouse has a mouse wheel you can use it to scroll or zoom, depending on the settings in the ![]() Preferences window. If you have set the mouse wheel to scroll vertically hold down the Ctrl key to zoom, and vice versa. If you have set the mouse wheel to scroll vertically, hold down the Alt key to scroll horizontally.
Preferences window. If you have set the mouse wheel to scroll vertically hold down the Ctrl key to zoom, and vice versa. If you have set the mouse wheel to scroll vertically, hold down the Alt key to scroll horizontally.
Keyboard accelerators
You can change the selected table or seat using Alt+Left arrow and Alt+Right arrow (change table) and Alt+Up arrow and Alt+Down arrow (change seat).
Printing, copying and exporting
When you are happy with the layout you can print this page with File>![]() Print. You can also export the image as a PDF, PNG, BMP or JPEG file using File>
Print. You can also export the image as a PDF, PNG, BMP or JPEG file using File>![]() Export or copy it to the clipboard using Edit>
Export or copy it to the clipboard using Edit>![]() Copy.
Copy.
See also: