The ![]() Import Data window allows you to import data into your plan from other applications, for example from an Excel, CSV or text file. This can save you a lot of typing. To display this window select File>
Import Data window allows you to import data into your plan from other applications, for example from an Excel, CSV or text file. This can save you a lot of typing. To display this window select File>![]() Import... or the equivalent Insert tool bar button. The
Import... or the equivalent Insert tool bar button. The ![]() Import window will be displayed. Select Excel/CSV/text file and click OK. An Open window will be displayed. Select the file you wish to import. The
Import window will be displayed. Select Excel/CSV/text file and click OK. An Open window will be displayed. Select the file you wish to import. The ![]() Import Data window will be displayed.
Import Data window will be displayed.
Note PerfectTablePlan can only read Excel .xls/.xlsx files if you have Excel installed. Otherwise you will have to convert it to a .csv which PerfectTablePlan can read. Renaming a file from .xls/.xlsx to .csv will not work.
Mapping imported columns to guest properties
Setting up common titles will often help PerfectTablePlan to make better sense of the data you are importing. Click on the Titles button to set your title preferences.
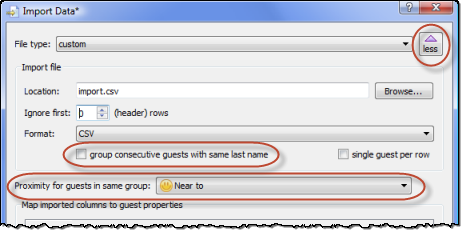
Select File type to import a pre-defined file type. Select custom to define your own. Click on the ![]() button to show more options.
button to show more options.
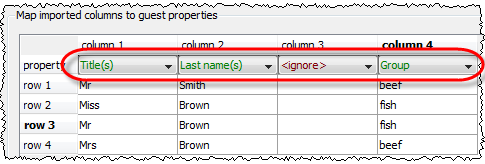
Map imported columns to guest properties shows you how the file data will be imported, including the effects of various options described below.
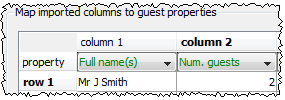
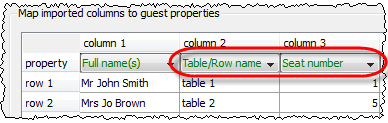
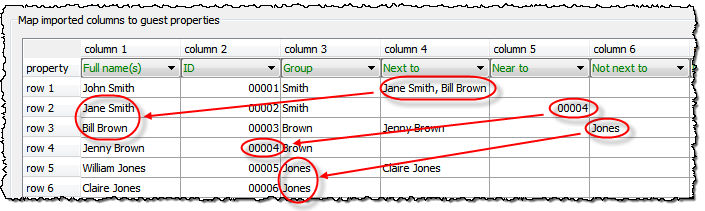
If you have selected the File type as custom you need to tell PerfectTablePlan which columns in the import file correspond to which guest properties. Select from the drop-down lists at the top of each column to do this. For example column 1 might correspond to the guest title, column 2 column to the guest last name and the column 4 column to the guest meal choice. Leave the drop-down list as <ignore> to ignore the contents of a column.
Empty lines in your import file are ignored.
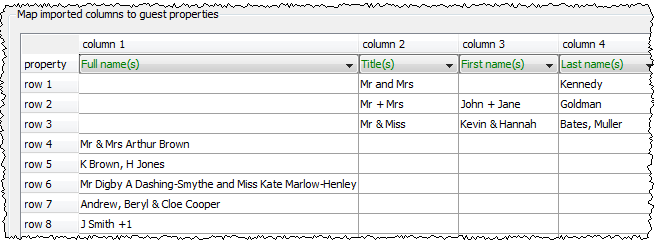
If you have multiple guests in one row or the title, first name or last name are not in separate columns, PerfectTablePlan will do it's best to unravel them. For example it can handle all the following:
If title is imported, but not gender or age, the import will attempt to guess the gender or age from the title using the titles set in the ![]() Preferences window.
Preferences window.
Note You can edit information in the table. This will change the information imported, but not affect the contents of the file you are importing. Make sure you press Enter to confirm any edits before clicking on Apply or OK.
Text is imported directly except for Gender, Age, VIP and RSVP, which are based on the values below:
Column |
Values |
||||||||||||||||
Gender |
Text must start with:
otherwise the guest is imported with unknown gender |
||||||||||||||||
Age |
Text must start with:
otherwise the guest is imported as an adult |
||||||||||||||||
VIP |
Text must start with:
otherwise the guest is imported as an non-VIP |
||||||||||||||||
RSVP |
Text must be:
Or else start with:
Otherwise the RSVP status is unset. |
You can easily edit any of these properties at a later point.
Importing groups
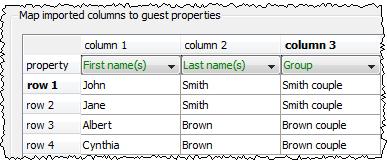
If you wish to import guests as couples, families and/or groups you need to:
| 1. | have a group column in your input data |
| 2. | use the same name in the group column for each person in the couple, family or group |
| 3. | make this column the group field during import |
If group consecutive guests with same last name is checked then consecutive guests with the same last name will be added to the same group. This can be useful for family events. This option is not available if you have set a group column.
You can choose the proximity to use for members of the same group from the Proximity for guests in the same group drop-down list.
The Num. guests field is the number of anonymous guests to be added to the names imported. It can be from 0 to 999. For example, if the guest is "John Smith" and Num. guests field is 2 the guests "John Smith" and 2 anonymous guests will be added (all in the same group).
The Num. in group field is the total number of guests in the group, including any named guests. It can be from 0 to 999. For example, if the guest is "John Smith" and Num. in group field is 4 the guests "John Smith" and 3 anonymous guests will be added (all in the same group). If Num. in group is fewer than the number of named guests, it will be ignored.
Note You can set the Num. guests or Num. in group column, but not both.
You can easily change the grouping of guests later by dragging them to another group in the ![]() Groups pane.
Groups pane.
Importing seating dataYou can specify the guest table or table+seat during import. You must create tables with the appropriate names and numbers of seats before you import guests.
For more information see Import seating data.
Importing guest proximitiesYou can specify which guests to sit near to (or away from) during import. Guests can be referred to by name, id or group.
For more information see Import proximity data. Importing guest idsSelect ID to designate a column as containing the unique identifier for guests. The identifier can be any unique string of characters of any length. The guest will keep this identifier right through to saving or exporting the plan, even if their name is changed. If you don't have an ID column guests will be assigned unique identifiers by PerfectTablePlan. |
Further options
Location shows the location of the import file. Worksheet shows the name of the worksheet (tab) selected from the Excel spreadsheet. Click on the Browse... button to change the file/worksheet you wish to import.
Use Ignore first if you wish to ignore one or more rows in the file. Often the first row is a header and you won't want to import it.
Use the Format drop-down list to choose whether the imported file is in Excel format, CSV format or a custom format (e.g. columns separated by Tab characters). If you are using a custom format, set Column separator and Row separator to the field and record separators in the import file.
Check group consecutive guests with same last name if you want to automatically assign consecutive guests with the same last name into the same group. This option is not available if you have selected a group column.
Uncheck single guest per row if some rows might contain names of multiple guests e.g. if you want to interpret "Mr & Mrs Smith" as separate guests "Mr Smith" and "Mrs Smith".
Click on Add row to add an additional row to be input. This is useful if you want to type in the data for additional guests. If a row is selected the new row will be added below, otherwise it will be added to the end.
Click on Delete row to delete the currently selected row.
Click on Add column to add an additional column to be input. This is useful if you want to type in some additional data for each guest, e.g. their gender or group. If a column is selected the new row will be added to the right, otherwise it will be added to the end.
Click on Split column(s)... to split one or more selected columns into multiple columns. Click on Join columns... to join two or more selected columns into a single column. See below for more details.
Click on Delete column to delete the currently selected column.
Splitting and joining columns
When you are importing it can be useful to split and join columns. For example you might want to split a column in the format "name, company" into two separate columns "name" and "company", so you can import them into separate fields in PerfectTablePlan.
You can carry out multiple split and join operations to get the data into the appropriate format.
To split, select on one or more columns you want to split and click on the Split column(s)... button. The ![]() Split Columns window will appear.
Split Columns window will appear.
To join, select two to four columns you want to join and click on the Join columns... button. The ![]() Join Columns window will appear.
Join Columns window will appear.
Select multiple columns using Shift+click or Ctrl+Click.
![]() Video with audio (0:38 minutes)
Video with audio (0:38 minutes)
Buttons
Click OK to import the data and close the window. Click Cancel to discard the changes.
See also:
Importing guests from Excel files
Importing guests from text and CSV files
Importing guest details from Facebook
Import guest details from Outlook