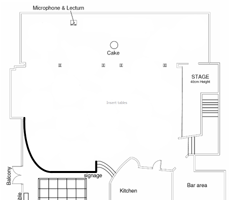
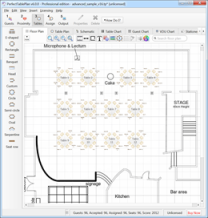
If you have a scale image of the venue you can use it as the background to your floor plan. This can save you a lot of time drawing walls, doors and other features. Note If your image is in PDF format, you will need to convert to an image format (such as PNG) before you can import it to PerfectTablePlan. There are various ways to do this, for example you can use an online PDF to PNG converter such as zamzar.com, easypdf.com or pdf2png.com (use of third party websites is at your own risk). Our you can do a screen capture of the PDF and save it as a PNG image file. 1.Click on the 2.Click on the Browse... button and select an image file. 3.Set the Background image size to the size the image should be in the floor plan (in metres or feet). It is important you get this correct or the floor plan won't be to scale (see below). 4.Click OK. 5.You can now place tables and other floor plan items on top of the floor plan image.
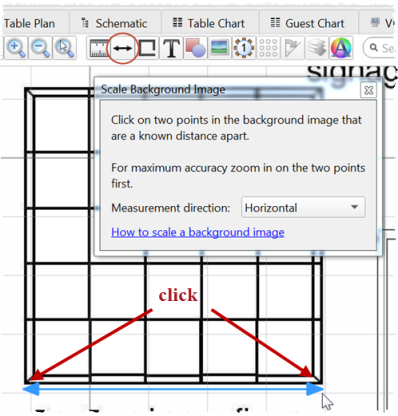
Scaling the image correctlyIf you are using an image of the venue as a background image, it is important to scale it correctly. This is easy as long as you know the size of a feature on the floor plan: •Add a background image, if you haven't done so already (see above). •Identify a feature in the floor plan that you know the size of. This might be a scale marked on the floor plan or a wall or stage whose dimensions are known. For accuracy, the bigger the feature the better. Zoom in/out so this feature fills most of the screen. •Click the •The Scale Background Image window will appear. Choose Free, Horizontal or Vertical depending on the orientation of the feature identified. •Click on one end of the feature. Release the mouse button (it isn't a drag operation). •Move the mouse pointer to the other end of the feature. An arrow will be drawn between the mouse position and the first position clicked. •Click on the other end of the feature.
•The
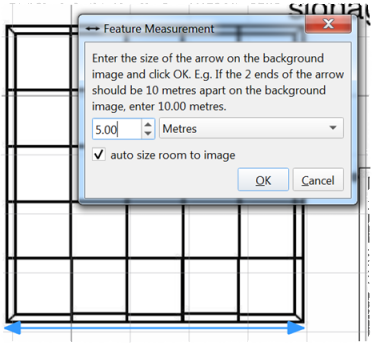
•Click OK. The background image will now be scaled so that the feature you identified is the correct size. •If you aren't happy with the results you can You can verify the feature is now the correct size by creating a rectangle of an appropriate size and comparing it to the feature in the background image. Hint When the |
See also: