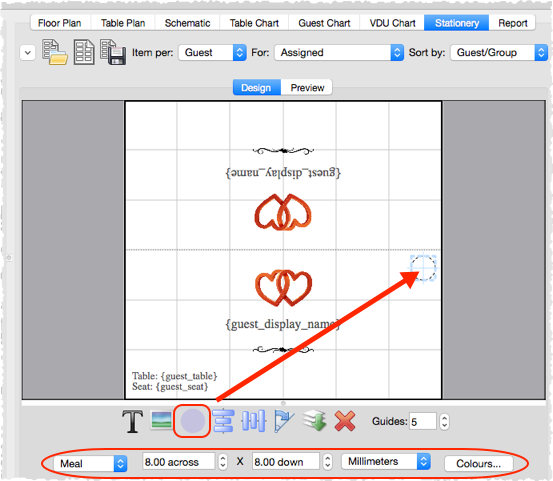
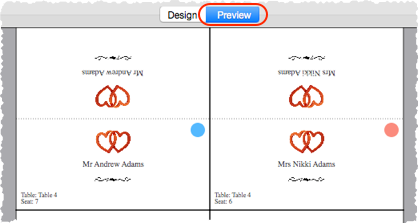
Colour coded spots can be a useful way to convey information on stationery. For example you can put colour coded spots on place cards to tell the serving staff what meal has been ordered (e.g. red=beef, blue=chicken, green=vegetarian). You can also use it to discretely convey information you might not wish to put in text form, e.g. whether a guest has paid!
To add colour coded spots to your stationery:
1.Ensure that the ![]() Design tab of the
Design tab of the ![]() Stationery pane is at the front and the Item per drop-down list is set to Guest.
Stationery pane is at the front and the Item per drop-down list is set to Guest.
2.Click on the ![]() Insert Colour spot button at the bottom of the
Insert Colour spot button at the bottom of the ![]() Stationery pane.
Stationery pane.
3.Click the cross hair cursor where you want to place the centre of the colour spot.
4.Click on the drop-down list to choose which guest property you wish to represent (Gender, Group, Meal or custom field of type Yes/No, Selection or Tags).
5.Set the colour spot across and down size. Note that this is a bounding area and the colour spots may not fill all of it. If you expect to have to have multiple colour spots (e.g. because you have multiple meal selections) you may need to set a rectangular (rather than square) bounding area.
6.Click on the ![]() Preview tab of the
Preview tab of the ![]() Stationery pane to see how the spots will appear when merged.
Stationery pane to see how the spots will appear when merged.


You can click on the Colours... button to change the colours used in the ![]() Visualization colours window.
Visualization colours window.
The number of colour spots varies. E.g. If you are using colour spots to represent meal selection or custom fields of type Tags, a colour spot will be displayed for each comma separated value. So if the meal choice is listed as "soup,fish,ice cream" then 3 colour spots will be displayed.
Colour coded spots are not shown in ![]() Preview tab or in print outs if the Item per drop-down list is set to Group or Table.
Preview tab or in print outs if the Item per drop-down list is set to Group or Table.
![]() Video with audio (1:39 minutes)
Video with audio (1:39 minutes)
See also:
•Add a graphic/image/clipart to the stationery