Note You can also view this tutorial as a movie on our website. The tutorial is also on your CD, if you purchased one.
For an alternative view of the table plan look at the ![]() Schematic pane. It shows the same information in a different format. It doesn't show the positioning of tables, but it does show the scoring. Click the
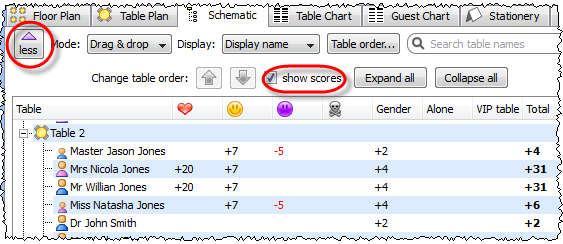
Schematic pane. It shows the same information in a different format. It doesn't show the positioning of tables, but it does show the scoring. Click the ![]() button and check the show scores check box. The higher the score, generally the better the plan. In the example below (which may be different to yours) you can see that Jason Jones has a total score of +4 made up of:
button and check the show scores check box. The higher the score, generally the better the plan. In the example below (which may be different to yours) you can see that Jason Jones has a total score of +4 made up of:
+5 for being next to Mrs Nicola Jones with ![]() proximity
proximity
+2 for being on same table as Mr William Jones with ![]() proximity
proximity
-5 for being on same table to Miss Natasha Jones with ![]() proximity
proximity
+2 for being a male next to a female
= +4 total
![]() Auto Assign Seats tries to find the highest scoring layout. You can run it as often as you like. Each time it will start with the current plan and attempt to improve it. If you don't like the changes made by the
Auto Assign Seats tries to find the highest scoring layout. You can run it as often as you like. Each time it will start with the current plan and attempt to improve it. If you don't like the changes made by the ![]() Auto Assign Seats you can undo them by selecting Edit>
Auto Assign Seats you can undo them by selecting Edit>![]() Undo.
Undo.
You can also drag guests between seats in the ![]() Schematic pane.
Schematic pane.
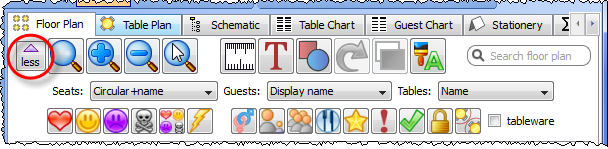
Click on the ![]() Floor Plan pane tab to bring it to the front. Click on the
Floor Plan pane tab to bring it to the front. Click on the ![]() button, some additional buttons will be shown.
button, some additional buttons will be shown.
Holding down any of the ![]()
![]()
![]()
![]() buttons will draw lines between guests who have this proximity. Holding down the
buttons will draw lines between guests who have this proximity. Holding down the ![]() button shows all proximities. The lines are coloured according to the proximity, e.g. red for
button shows all proximities. The lines are coloured according to the proximity, e.g. red for ![]() .
.
Holding down the ![]() button draws lines between guests who are not optimally placed, for example guests with
button draws lines between guests who are not optimally placed, for example guests with ![]() proximity who are sat on the same table.
proximity who are sat on the same table.
Depress the ![]() button to show guest genders (blue for male, pink for female).
button to show guest genders (blue for male, pink for female).
Depress the ![]() button to show guest age (children are shown smaller).
button to show guest age (children are shown smaller).
Depress the ![]() button to show groups (different groups are shown in different colours, up to 100 groups - the colours are selected automatically).
button to show groups (different groups are shown in different colours, up to 100 groups - the colours are selected automatically).
Depress the ![]() button to show colour-coded meal choices. Each meal is displayed in a different colour (up to 10 colours). If you have more than one course (e.g. “soup,fish,ice cream”) the courses will be displayed as concentric rings: outer ring=first course, second ring=second course etc.
button to show colour-coded meal choices. Each meal is displayed in a different colour (up to 10 colours). If you have more than one course (e.g. “soup,fish,ice cream”) the courses will be displayed as concentric rings: outer ring=first course, second ring=second course etc.
Depress the ![]() button to show guest and table VIP status (shown with stars).
button to show guest and table VIP status (shown with stars).
Depress the![]() button to show any guests with special requirements (i.e. with an entry in their Special req field).
button to show any guests with special requirements (i.e. with an entry in their Special req field).
Depress the ![]() button to show guest RSVP status.
button to show guest RSVP status.
Depress the ![]() button to show which guests are locked (a padlock is displayed for locked guests).
button to show which guests are locked (a padlock is displayed for locked guests).
Some of the above will be easier to see if you use simple (e.g. default ) colours in the ![]() Floor Plan pane. Note that your layout is likely to be different to the one shown below.
Floor Plan pane. Note that your layout is likely to be different to the one shown below.
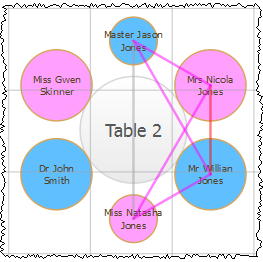
Gender (colour), age (size) and proximity (lines) are displayed.
Using these buttons allows you to easily see whether moving guests to different seats could improve your table plan. Try dragging some of the guests to different seats. But keep an eye on the score in the Status bar to make sure that making some things better doesn't make other things worse.
You can also see a useful summary of your plan in the ![]() Report pane.
Report pane.
If you want to try to create a more realistic table plan, try loading one of the example plans installed with PerfectTablePlan (select File>![]() Open).
Open).
See also:
Next: 7. Print plan >>