Note You can also view this tutorial as a movie on our website.
The next step to creating your table plan is to decide who should sit near (or not near) whom.
Click on the ![]() 2.Proximity button in the Task tool bar to show the
2.Proximity button in the Task tool bar to show the ![]() Proximity pane:
Proximity pane:
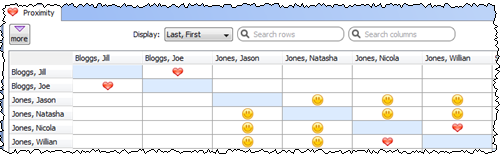
The ![]() means that these guests should be placed next to each other. The
means that these guests should be placed next to each other. The ![]() means that these guests should be placed near to each other, either next to or on the same table, but lower priority than
means that these guests should be placed near to each other, either next to or on the same table, but lower priority than ![]() .
.
Let us assume you have been asked not to seat Jason and Natasha next to each other. Click on the cell where the column for Jason and the row for Natasha intersect. Pull down the drop-down list and select ![]() Not Next to.
Not Next to.
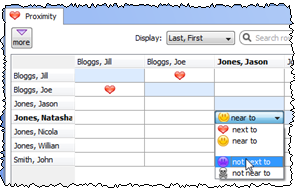
Notice that the corresponding row for Jason and column for Natasha changes to keep the table symmetric.
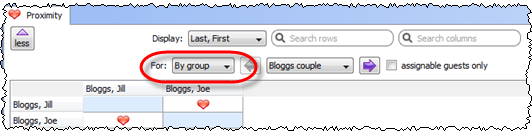
Click on the ![]() button at the top of the pane to show additional options. Select by group from the For drop-down list. The
button at the top of the pane to show additional options. Select by group from the For drop-down list. The ![]() Proximity pane now shows just one group at a time.
Proximity pane now shows just one group at a time.
The proximity will become important when we start assigning guests to seats.
Next: 4. Add tables >>